
ตั้ง Vite Admin Panel ให้ IoT Platform กัน!
Branch:
workshop/dev-15-vite-setupPhase: Development (15/21) Repo: kangana1024/iot-workshop
เฮ้! น้องๆ มาแล้ว (ノ◕ヮ◕)ノ*:・゚✧
เรามานั่งคิดว่า… ถึงตอนนี้ backend พวก IoT API, device management, auth ระบบทุกอย่างพร้อมหมดแล้ว แต่ยังไม่มีหน้าให้คนใช้งานเลยนะ จะให้ admin ไปยิง curl ทุกวันก็คงไม่ไหว 555
นั่นแหละคือเหตุผลที่เราต้องสร้าง Admin Panel!
คิดง่ายๆ ว่า Admin Panel มันเหมือน ห้องควบคุมในโรงงาน — มีจอแสดงสถานะเครื่องทุกตัว, มีสวิตช์ให้กด, มีแจ้งเตือนเมื่อมีอะไรผิดปกติ แทนที่วิศวกรจะต้องวิ่งไปดูเครื่องทีละตัว
Workshop นี้เราจะสร้าง Admin Panel ด้วย stack ที่ทันสมัยที่สุดตอนนี้นะ มาลุยกัน!
สิ่งที่น้องๆ จะได้กลับบ้าน
หลังจากอ่านจบ น้องๆ จะรู้จัก:
- ว่าทำไมถึงเลือก Vite แทน Create React App (WHY ก่อนเลย!)
- ตั้งค่า Vite + React + TypeScript พร้อม path aliases สวยงาม
- Config Tailwind CSS ให้มี custom design tokens
- สร้าง Layout components (Sidebar, Header, AppLayout) แบบมืออาชีพ
- ตั้ง React Router v6 พร้อม Protected Routes และ Role-based access
- จัดการ state ด้วย Zustand แบบเบาๆ ไม่ซับซ้อน
- สร้าง Axios service พร้อม interceptors ที่ auto-refresh JWT token
ก่อนจะเริ่ม: ทำไมถึงเลือก Stack นี้?
เรามักถูกถามว่า “พี่ใช้ Vite เพราะอะไร ไม่ใช้ Next.js?”
คำตอบง่ายมาก — Admin Panel ไม่ต้องการ SSR
Admin Panel  →  ต้องการ SPA (Single Page Application)
                - Login แล้วค้างหน้าไว้นาน
                - Data update แบบ real-time
                - ไม่ต้องการ SEO
                - Users มีจำนวนน้อย แต่ใช้บ่อยมาก

Public Website → ต้องการ SSR (Server Side Rendering)
                - มี traffic สูง
                - SEO สำคัญ
                - First load ต้องเร็ว
แล้วทำไม Vite แทน Create React App (CRA)? เพราะ CRA ช้ามากในปี 2026 ครับ Vite ใช้ native ES modules ทำให้ dev server เริ่มต้นใน < 1 วินาที เหมือนเปิดไฟเทียบกับรอต้มน้ำ 555
ภาพรวม Architecture ก่อน Code
ก่อนลงมือ เรามาดูภาพรวมว่า pieces ต่างๆ มันต่อกันยังไง:

เห็นมั้ยครับว่ามันต่อกันยังไง? Vite dev server ทำหน้าที่ proxy request ไปให้ backend เลย ไม่ต้องกังวลเรื่อง CORS ในช่วง development
Step 1: ยิง npm create แล้วลุยต่อ
# ไปที่ root ของ monorepo
cd iot-workshop

# สร้าง Vite project ใน frontend-admin directory
npm create vite@latest frontend-admin -- --template react-ts

cd frontend-admin

# ติดตั้ง dependencies พื้นฐาน
npm install

# ติดตั้ง dependencies เพิ่มเติม
npm install react-router-dom@6 zustand axios
npm install @tanstack/react-query
npm install react-hook-form @hookform/resolvers zod
npm install sonner react-hot-toast
npm install lucide-react clsx tailwind-merge

# Dev dependencies
npm install -D tailwindcss postcss autoprefixer @types/node
npx tailwindcss init -p
แค่นี้ก็ได้ React app พร้อมใช้แล้ว เร็วมากเลยนะเทียบกับสมัยก่อนที่ต้องนั่ง config webpack เองทั้งวัน (´;ω;`)
Step 2: TypeScript Config + Path Aliases
ทำไมถึงต้อง Path Aliases?
ลองนึกภาพว่าไม่มี path aliases:
// สยองมาก import hell
import { Button } from '../../../components/ui/Button'
import { useAuthStore } from '../../../../stores/auth.store'
import type { Device } from '../../../types/device.types'
กับแบบมี aliases:
// อ่านง่าย รู้ทันทีว่ามาจากไหน
import { Button } from '@components/ui/Button'
import { useAuthStore } from '@stores/auth.store'
import type { Device } from '@types/device.types'
เหมือนความต่างของบ้านที่มีป้ายบอกห้อง กับบ้านที่ต้องนับก้าวเองทุกครั้ง 555
แก้ไข tsconfig.json:
{
  "compilerOptions": {
    "target": "ES2020",
    "useDefineForClassFields": true,
    "lib": ["ES2020", "DOM", "DOM.Iterable"],
    "module": "ESNext",
    "skipLibCheck": true,
    "moduleResolution": "bundler",
    "allowImportingTsExtensions": true,
    "resolveJsonModule": true,
    "isolatedModules": true,
    "noEmit": true,
    "jsx": "react-jsx",
    "strict": true,
    "noUnusedLocals": true,
    "noUnusedParameters": true,
    "noFallthroughCasesInSwitch": true,
    "baseUrl": ".",
    "paths": {
      "@/*": ["./src/*"],
      "@components/*": ["./src/components/*"],
      "@pages/*": ["./src/pages/*"],
      "@hooks/*": ["./src/hooks/*"],
      "@services/*": ["./src/services/*"],
      "@stores/*": ["./src/stores/*"],
      "@types/*": ["./src/types/*"],
      "@utils/*": ["./src/utils/*"]
    }
  },
  "include": ["src"],
  "references": [{ "path": "./tsconfig.node.json" }]
}
แล้ว TypeScript รู้ path aliases แล้ว แต่ Vite ยังไม่รู้ ต้องบอกทั้งคู่นะครับ! แก้ไข vite.config.ts:
import { defineConfig } from 'vite'
import react from '@vitejs/plugin-react'
import path from 'path'

export default defineConfig({
  plugins: [react()],
  resolve: {
    alias: {
      '@': path.resolve(__dirname, './src'),
      '@components': path.resolve(__dirname, './src/components'),
      '@pages': path.resolve(__dirname, './src/pages'),
      '@hooks': path.resolve(__dirname, './src/hooks'),
      '@services': path.resolve(__dirname, './src/services'),
      '@stores': path.resolve(__dirname, './src/stores'),
      '@types': path.resolve(__dirname, './src/types'),
      '@utils': path.resolve(__dirname, './src/utils'),
    },
  },
  server: {
    port: 5173,
    proxy: {
      '/api': {
        target: 'http://localhost:3000',
        changeOrigin: true,
      },
    },
  },
})
ส่วน proxy ตรงนี้สำคัญมากนะ — ทุก request ที่ขึ้นต้นด้วย /api จะถูก forward ไปที่ backend port 3000 อัตโนมัติ เราก็ไม่ต้องกังวล CORS เลยในช่วง dev
Step 3: Tailwind CSS + Design Tokens
ทำไมถึงต้อง Custom Colors?
เรานิยามสี primary และ sidebar เป็นของเราเอง แทนที่จะใช้ blue-600 ตรงๆ เพราะถ้าวันนึงผู้บริหารบอกว่า “เปลี่ยนสีหลักเป็นเขียว” เราแค่เปลี่ยนใน config ที่เดียวจบ ไม่ต้องไล่หา blue-600 ทุก component ในโปรเจค
แก้ไข tailwind.config.js:
/** @type {import('tailwindcss').Config} */
export default {
  content: [
    "./index.html",
    "./src/**/*.{js,ts,jsx,tsx}",
  ],
  darkMode: 'class',
  theme: {
    extend: {
      colors: {
        primary: {
          50: '#eff6ff',
          100: '#dbeafe',
          200: '#bfdbfe',
          300: '#93c5fd',
          400: '#60a5fa',
          500: '#3b82f6',
          600: '#2563eb',
          700: '#1d4ed8',
          800: '#1e40af',
          900: '#1e3a8a',
        },
        sidebar: {
          bg: '#0f172a',
          text: '#94a3b8',
          active: '#3b82f6',
          hover: '#1e293b',
        },
      },
      fontFamily: {
        sans: ['Inter', 'system-ui', 'sans-serif'],
        mono: ['JetBrains Mono', 'monospace'],
      },
    },
  },
  plugins: [],
}
แก้ไข src/index.css พร้อม utility classes ที่ใช้บ่อย:
@import url('https://fonts.googleapis.com/css2?family=Inter:wght@300;400;500;600;700&display=swap');

@tailwind base;
@tailwind components;
@tailwind utilities;

@layer base {
  body {
    @apply bg-gray-50 text-gray-900 font-sans;
  }

  * {
    @apply box-border;
  }
}

@layer components {
  .btn {
    @apply inline-flex items-center justify-center px-4 py-2 text-sm font-medium rounded-lg transition-colors focus:outline-none focus:ring-2 focus:ring-offset-2 disabled:opacity-50 disabled:cursor-not-allowed;
  }

  .btn-primary {
    @apply btn bg-primary-600 text-white hover:bg-primary-700 focus:ring-primary-500;
  }

  .btn-secondary {
    @apply btn bg-white text-gray-700 border border-gray-300 hover:bg-gray-50 focus:ring-primary-500;
  }

  .btn-danger {
    @apply btn bg-red-600 text-white hover:bg-red-700 focus:ring-red-500;
  }

  .card {
    @apply bg-white rounded-xl shadow-sm border border-gray-200 p-6;
  }

  .input {
    @apply w-full px-3 py-2 text-sm border border-gray-300 rounded-lg focus:outline-none focus:ring-2 focus:ring-primary-500 focus:border-transparent transition-colors;
  }

  .label {
    @apply block text-sm font-medium text-gray-700 mb-1;
  }

  .badge {
    @apply inline-flex items-center px-2.5 py-0.5 rounded-full text-xs font-medium;
  }

  .badge-green {
    @apply badge bg-green-100 text-green-800;
  }

  .badge-red {
    @apply badge bg-red-100 text-red-800;
  }

  .badge-yellow {
    @apply badge bg-yellow-100 text-yellow-800;
  }

  .badge-blue {
    @apply badge bg-blue-100 text-blue-800;
  }
}
Step 4: โครงสร้าง Directory — บ้านของ Code
ก่อนเขียน code จริง เรามาออกแบบ “บ้าน” กันก่อน โครงสร้างดีๆ ทำให้ทีมทำงานง่าย หาของเจอเร็ว เหมือนบ้านที่จัดระเบียบดี vs บ้านที่ของกระจัดกระจาย
frontend-admin/
├── public/
│   └── favicon.ico
├── src/
│   ├── components/
│   │   ├── layout/          ← โครงสร้างหลักของ app
│   │   │   ├── AppLayout.tsx
│   │   │   ├── Sidebar.tsx
│   │   │   ├── Header.tsx
│   │   │   └── index.ts
│   │   ├── ui/              ← building blocks ที่ใช้ซ้ำทั่วทั้ง app
│   │   │   ├── Button.tsx
│   │   │   ├── Input.tsx
│   │   │   ├── Modal.tsx
│   │   │   ├── Table.tsx
│   │   │   ├── Badge.tsx
│   │   │   ├── Spinner.tsx
│   │   │   └── index.ts
│   │   └── common/          ← components ที่ใช้ในหลาย page
│   │       ├── PageHeader.tsx
│   │       ├── EmptyState.tsx
│   │       └── ErrorBoundary.tsx
│   ├── pages/               ← แต่ละหน้า แยกตาม feature
│   │   ├── auth/
│   │   │   ├── LoginPage.tsx
│   │   │   └── RegisterPage.tsx
│   │   ├── dashboard/
│   │   │   └── DashboardPage.tsx
│   │   ├── devices/
│   │   │   ├── DevicesPage.tsx
│   │   │   ├── DeviceDetailPage.tsx
│   │   │   └── DeviceFormPage.tsx
│   │   ├── users/
│   │   │   ├── UsersPage.tsx
│   │   │   └── UserFormPage.tsx
│   │   ├── monitoring/
│   │   │   └── MonitoringPage.tsx
│   │   └── settings/
│   │       └── SettingsPage.tsx
│   ├── hooks/               ← custom hooks แยก logic ออกจาก UI
│   │   ├── useAuth.ts
│   │   ├── useDevices.ts
│   │   ├── useUsers.ts
│   │   └── useDebounce.ts
│   ├── services/            ← ทุก API call อยู่ที่นี่
│   │   ├── api.ts
│   │   ├── auth.service.ts
│   │   ├── device.service.ts
│   │   └── user.service.ts
│   ├── stores/              ← global state
│   │   ├── auth.store.ts
│   │   ├── ui.store.ts
│   │   └── device.store.ts
│   ├── types/               ← TypeScript types ทั้งหมด
│   │   ├── auth.types.ts
│   │   ├── device.types.ts
│   │   ├── user.types.ts
│   │   └── api.types.ts
│   ├── utils/               ← helper functions
│   │   ├── cn.ts
│   │   ├── format.ts
│   │   └── storage.ts
│   ├── router/              ← routing config
│   │   ├── index.tsx
│   │   ├── ProtectedRoute.tsx
│   │   └── routes.ts
│   ├── App.tsx
│   └── main.tsx
├── .env.example
├── package.json
├── tailwind.config.js
├── tsconfig.json
└── vite.config.ts
Step 5: TypeScript Types — พิมพ์แบบมีวินัย
ทำไมถึงต้อง Types?
เรามักบอกน้องๆ ว่า Types ใน TypeScript มันเหมือน ป้ายบอกทาง — เวลา backend ส่ง response มา เราต้องรู้ว่ามันมี field อะไรบ้าง แทนที่จะต้องดู API docs ทุกครั้ง TypeScript จะบอกเลยว่าขาดอะไร เกินอะไร
สร้าง src/types/api.types.ts:
export interface ApiResponse<T> {
  success: boolean
  data: T
  message?: string
  errors?: Record<string, string[]>
}

export interface PaginatedResponse<T> {
  success: boolean
  data: T[]
  pagination: {
    page: number
    limit: number
    total: number
    totalPages: number
  }
}

export interface ApiError {
  message: string
  statusCode: number
  errors?: Record<string, string[]>
}
สร้าง src/types/device.types.ts:
export type DeviceStatus = 'online' | 'offline' | 'maintenance' | 'error'
export type DeviceType = 'sensor' | 'actuator' | 'gateway' | 'controller'

export interface Device {
  id: string
  deviceId: string
  name: string
  type: DeviceType
  status: DeviceStatus
  location: string
  ipAddress?: string
  macAddress?: string
  firmware: string
  lastSeen: string
  createdAt: string
  updatedAt: string
  metadata?: Record<string, unknown>
}

export interface CreateDeviceInput {
  deviceId: string
  name: string
  type: DeviceType
  location: string
  ipAddress?: string
  macAddress?: string
  firmware?: string
}

export interface UpdateDeviceInput extends Partial<CreateDeviceInput> {
  status?: DeviceStatus
}

export interface DeviceFilter {
  search?: string
  status?: DeviceStatus
  type?: DeviceType
  location?: string
  page?: number
  limit?: number
}
สร้าง src/types/user.types.ts:
export type UserRole = 'admin' | 'operator' | 'viewer'

export interface User {
  id: string
  username: string
  email: string
  firstName: string
  lastName: string
  role: UserRole
  isActive: boolean
  lastLogin?: string
  createdAt: string
  updatedAt: string
}

export interface CreateUserInput {
  username: string
  email: string
  password: string
  firstName: string
  lastName: string
  role: UserRole
}

export interface UpdateUserInput extends Partial<Omit<CreateUserInput, 'password'>> {
  isActive?: boolean
}
Step 6: Axios Interceptors — ยามที่คอย Guard ทุก Request
ทำไมถึงต้อง Interceptors?
คิดว่า Interceptors เหมือน เจ้าหน้าที่รักษาความปลอดภัยที่ประตู
- Request Interceptor = เจ้าหน้าที่ที่ตรวจ badge ก่อนเข้า แนบ JWT token กับทุก request อัตโนมัติ ไม่ต้องเขียน
headers.Authorizationทุกที่ - Response Interceptor = เจ้าหน้าที่ที่รับมือเมื่อ badge หมดอายุ (401 error) จะพยายาม refresh token ก่อน ถ้า refresh ไม่ได้ค่อย logout
ทุก API Request
       │
       ▼
┌──────────────────┐
│ Request          │
│ Interceptor      │  ← แนบ JWT Token อัตโนมัติ
│ (ยาม ขาออก)      │
└────────┬─────────┘
         │
         ▼
    [Backend API]
         │
         ▼
┌──────────────────┐
│ Response         │
│ Interceptor      │  ← ถ้า 401 → refresh token
│ (ยาม ขากลับ)     │     ถ้า refresh ไม่ได้ → logout
└──────────────────┘
สร้าง src/services/api.ts:
import axios, { AxiosError, AxiosInstance, InternalAxiosRequestConfig } from 'axios'
import { useAuthStore } from '@stores/auth.store'

const BASE_URL = import.meta.env.VITE_API_URL || 'http://localhost:3000/api'

// สร้าง axios instance
const api: AxiosInstance = axios.create({
  baseURL: BASE_URL,
  timeout: 10000,
  headers: {
    'Content-Type': 'application/json',
  },
})

// Request interceptor - แนบ JWT token กับทุก request
api.interceptors.request.use(
  (config: InternalAxiosRequestConfig) => {
    const token = useAuthStore.getState().accessToken
    if (token) {
      config.headers.Authorization = `Bearer ${token}`
    }
    return config
  },
  (error) => {
    return Promise.reject(error)
  }
)

// Response interceptor - จัดการ error และ token refresh
api.interceptors.response.use(
  (response) => {
    return response
  },
  async (error: AxiosError) => {
    const originalRequest = error.config as InternalAxiosRequestConfig & { _retry?: boolean }

    // ถ้า 401 และยังไม่ได้ลอง refresh
    if (error.response?.status === 401 && !originalRequest._retry) {
      originalRequest._retry = true

      try {
        const refreshToken = useAuthStore.getState().refreshToken
        if (!refreshToken) {
          throw new Error('No refresh token')
        }

        // ขอ token ใหม่
        const response = await axios.post(`${BASE_URL}/auth/refresh`, {
          refreshToken,
        })

        const { accessToken } = response.data.data
        useAuthStore.getState().setAccessToken(accessToken)

        // ลอง request เดิมอีกครั้งพร้อม token ใหม่
        originalRequest.headers.Authorization = `Bearer ${accessToken}`
        return api(originalRequest)
      } catch {
        // Refresh token หมดอายุ - logout
        useAuthStore.getState().logout()
        window.location.href = '/login'
        return Promise.reject(error)
      }
    }

    return Promise.reject(error)
  }
)

export default api
สร้าง src/services/device.service.ts:
import api from './api'
import type { ApiResponse, PaginatedResponse } from '@types/api.types'
import type { Device, CreateDeviceInput, UpdateDeviceInput, DeviceFilter } from '@types/device.types'

export const deviceService = {
  // ดึงรายการ devices ทั้งหมด
  async getDevices(filter: DeviceFilter = {}): Promise<PaginatedResponse<Device>> {
    const params = new URLSearchParams()
    if (filter.search) params.set('search', filter.search)
    if (filter.status) params.set('status', filter.status)
    if (filter.type) params.set('type', filter.type)
    if (filter.location) params.set('location', filter.location)
    if (filter.page) params.set('page', String(filter.page))
    if (filter.limit) params.set('limit', String(filter.limit))

    const response = await api.get<PaginatedResponse<Device>>(`/devices?${params}`)
    return response.data
  },

  // ดึง device ตาม ID
  async getDevice(id: string): Promise<ApiResponse<Device>> {
    const response = await api.get<ApiResponse<Device>>(`/devices/${id}`)
    return response.data
  },

  // สร้าง device ใหม่
  async createDevice(input: CreateDeviceInput): Promise<ApiResponse<Device>> {
    const response = await api.post<ApiResponse<Device>>('/devices', input)
    return response.data
  },

  // อัปเดต device
  async updateDevice(id: string, input: UpdateDeviceInput): Promise<ApiResponse<Device>> {
    const response = await api.put<ApiResponse<Device>>(`/devices/${id}`, input)
    return response.data
  },

  // ลบ device
  async deleteDevice(id: string): Promise<ApiResponse<void>> {
    const response = await api.delete<ApiResponse<void>>(`/devices/${id}`)
    return response.data
  },

  // ลบ devices หลายตัวพร้อมกัน
  async bulkDeleteDevices(ids: string[]): Promise<ApiResponse<void>> {
    const response = await api.delete<ApiResponse<void>>('/devices/bulk', {
      data: { ids },
    })
    return response.data
  },

  // เปลี่ยน status ของ device
  async updateDeviceStatus(id: string, status: Device['status']): Promise<ApiResponse<Device>> {
    const response = await api.patch<ApiResponse<Device>>(`/devices/${id}/status`, { status })
    return response.data
  },
}
Step 7: Zustand — State Management แบบไม่ปวดหัว
ทำไม Zustand แทน Redux?
เรมใช้ Redux มาหลายปี มันดีครับ แต่ verbose มากสำหรับโปรเจคขนาดนี้ Zustand เหมือน ลิ้นชักเก็บของ — ง่าย เปิดหยิบปิดเสร็จ ไม่ต้องมี action creator, reducer, middleware stack ให้วุ่นวาย
Redux:  Action → Dispatch → Reducer → Store → Component
Zustand:         Store ← Component (อ่าน/เขียนตรง)
สร้าง src/stores/auth.store.ts:
import { create } from 'zustand'
import { persist, createJSONStorage } from 'zustand/middleware'
import type { User } from '@types/user.types'

interface AuthState {
  user: User | null
  accessToken: string | null
  refreshToken: string | null
  isAuthenticated: boolean

  // Actions
  setUser: (user: User) => void
  setAccessToken: (token: string) => void
  setTokens: (accessToken: string, refreshToken: string) => void
  logout: () => void
}

export const useAuthStore = create<AuthState>()(
  persist(
    (set) => ({
      user: null,
      accessToken: null,
      refreshToken: null,
      isAuthenticated: false,

      setUser: (user) => set({ user, isAuthenticated: true }),

      setAccessToken: (token) => set({ accessToken: token }),

      setTokens: (accessToken, refreshToken) =>
        set({ accessToken, refreshToken }),

      logout: () =>
        set({
          user: null,
          accessToken: null,
          refreshToken: null,
          isAuthenticated: false,
        }),
    }),
    {
      name: 'iot-admin-auth',
      storage: createJSONStorage(() => localStorage),
      partialize: (state) => ({
        user: state.user,
        accessToken: state.accessToken,
        refreshToken: state.refreshToken,
        isAuthenticated: state.isAuthenticated,
      }),
    }
  )
)
persist middleware ที่เห็นนี้คือตัวที่ทำให้ login แล้ว refresh browser ยังอยู่ครับ มันเซฟ state ลง localStorage อัตโนมัติ
สร้าง src/stores/ui.store.ts:
import { create } from 'zustand'

interface UIState {
  sidebarOpen: boolean
  sidebarCollapsed: boolean
  theme: 'light' | 'dark'

  // Actions
  toggleSidebar: () => void
  setSidebarOpen: (open: boolean) => void
  toggleSidebarCollapsed: () => void
  toggleTheme: () => void
}

export const useUIStore = create<UIState>((set) => ({
  sidebarOpen: true,
  sidebarCollapsed: false,
  theme: 'light',

  toggleSidebar: () => set((state) => ({ sidebarOpen: !state.sidebarOpen })),

  setSidebarOpen: (open) => set({ sidebarOpen: open }),

  toggleSidebarCollapsed: () =>
    set((state) => ({ sidebarCollapsed: !state.sidebarCollapsed })),

  toggleTheme: () =>
    set((state) => ({ theme: state.theme === 'light' ? 'dark' : 'light' })),
}))
Step 8: React Router v6 + Protected Routes
ทำไมถึงต้อง Protected Routes?
ลองนึกภาพว่าไม่มี Protected Routes — ใครก็พิมพ์ /admin/users เข้ามาได้เลย เหมือนสร้างตึกออฟฟิศแต่ไม่มีประตู ใครก็เดินเข้าได้หมด 555
Protected Route ทำหน้าที่เช็คก่อนว่า login แล้วหรือยัง ถ้ายัง redirect ไป login page ก่อน ถ้า role ไม่ตรงก็ redirect กลับ dashboard
สร้าง src/router/routes.ts:
export const ROUTES = {
  LOGIN: '/login',
  REGISTER: '/register',
  DASHBOARD: '/',
  DEVICES: '/devices',
  DEVICE_DETAIL: '/devices/:id',
  DEVICE_CREATE: '/devices/new',
  DEVICE_EDIT: '/devices/:id/edit',
  USERS: '/users',
  USER_CREATE: '/users/new',
  USER_EDIT: '/users/:id/edit',
  MONITORING: '/monitoring',
  SETTINGS: '/settings',
} as const

export type AppRoute = (typeof ROUTES)[keyof typeof ROUTES]
สร้าง src/router/ProtectedRoute.tsx:
import { Navigate, useLocation } from 'react-router-dom'
import { useAuthStore } from '@stores/auth.store'
import type { UserRole } from '@types/user.types'
import { ROUTES } from './routes'

interface ProtectedRouteProps {
  children: React.ReactNode
  allowedRoles?: UserRole[]
}

export function ProtectedRoute({ children, allowedRoles }: ProtectedRouteProps) {
  const { isAuthenticated, user } = useAuthStore()
  const location = useLocation()

  // ยังไม่ได้ login
  if (!isAuthenticated) {
    return <Navigate to={ROUTES.LOGIN} state={{ from: location }} replace />
  }

  // ตรวจสอบ role ถ้ามีการกำหนด
  if (allowedRoles && user && !allowedRoles.includes(user.role)) {
    return <Navigate to={ROUTES.DASHBOARD} replace />
  }

  return <>{children}</>
}
สร้าง src/router/index.tsx (ใช้ lazy loading ทุก page):
import { createBrowserRouter, RouterProvider } from 'react-router-dom'
import { AppLayout } from '@components/layout'
import { ProtectedRoute } from './ProtectedRoute'
import { ROUTES } from './routes'

// Lazy load pages สำหรับ code splitting
import { lazy, Suspense } from 'react'
import { Spinner } from '@components/ui'

const LoginPage = lazy(() => import('@pages/auth/LoginPage'))
const RegisterPage = lazy(() => import('@pages/auth/RegisterPage'))
const DashboardPage = lazy(() => import('@pages/dashboard/DashboardPage'))
const DevicesPage = lazy(() => import('@pages/devices/DevicesPage'))
const DeviceDetailPage = lazy(() => import('@pages/devices/DeviceDetailPage'))
const DeviceFormPage = lazy(() => import('@pages/devices/DeviceFormPage'))
const UsersPage = lazy(() => import('@pages/users/UsersPage'))
const UserFormPage = lazy(() => import('@pages/users/UserFormPage'))
const MonitoringPage = lazy(() => import('@pages/monitoring/MonitoringPage'))
const SettingsPage = lazy(() => import('@pages/settings/SettingsPage'))

const SuspenseWrapper = ({ children }: { children: React.ReactNode }) => (
  <Suspense
    fallback={
      <div className="flex items-center justify-center h-full">
        <Spinner size="lg" />
      </div>
    }
  >
    {children}
  </Suspense>
)

const router = createBrowserRouter([
  // Auth routes (ไม่ต้อง login)
  {
    path: ROUTES.LOGIN,
    element: <SuspenseWrapper><LoginPage /></SuspenseWrapper>,
  },
  {
    path: ROUTES.REGISTER,
    element: <SuspenseWrapper><RegisterPage /></SuspenseWrapper>,
  },
  // Protected routes
  {
    path: '/',
    element: (
      <ProtectedRoute>
        <AppLayout />
      </ProtectedRoute>
    ),
    children: [
      {
        index: true,
        element: <SuspenseWrapper><DashboardPage /></SuspenseWrapper>,
      },
      {
        path: 'devices',
        children: [
          {
            index: true,
            element: <SuspenseWrapper><DevicesPage /></SuspenseWrapper>,
          },
          {
            path: 'new',
            element: (
              <ProtectedRoute allowedRoles={['admin', 'operator']}>
                <SuspenseWrapper><DeviceFormPage /></SuspenseWrapper>
              </ProtectedRoute>
            ),
          },
          {
            path: ':id',
            element: <SuspenseWrapper><DeviceDetailPage /></SuspenseWrapper>,
          },
          {
            path: ':id/edit',
            element: (
              <ProtectedRoute allowedRoles={['admin', 'operator']}>
                <SuspenseWrapper><DeviceFormPage /></SuspenseWrapper>
              </ProtectedRoute>
            ),
          },
        ],
      },
      {
        path: 'users',
        children: [
          {
            index: true,
            element: (
              <ProtectedRoute allowedRoles={['admin']}>
                <SuspenseWrapper><UsersPage /></SuspenseWrapper>
              </ProtectedRoute>
            ),
          },
          {
            path: 'new',
            element: (
              <ProtectedRoute allowedRoles={['admin']}>
                <SuspenseWrapper><UserFormPage /></SuspenseWrapper>
              </ProtectedRoute>
            ),
          },
          {
            path: ':id/edit',
            element: (
              <ProtectedRoute allowedRoles={['admin']}>
                <SuspenseWrapper><UserFormPage /></SuspenseWrapper>
              </ProtectedRoute>
            ),
          },
        ],
      },
      {
        path: 'monitoring',
        element: <SuspenseWrapper><MonitoringPage /></SuspenseWrapper>,
      },
      {
        path: 'settings',
        element: (
          <ProtectedRoute allowedRoles={['admin']}>
            <SuspenseWrapper><SettingsPage /></SuspenseWrapper>
          </ProtectedRoute>
        ),
      },
    ],
  },
])

export function AppRouter() {
  return <RouterProvider router={router} />
}
Step 9: Layout Components — โครงกระดูกของ App
ทำไม Layout Components ถึงสำคัญ?
Layout components มันเหมือน โครงสร้างบ้าน — Sidebar คือผนัง Header คือหลังคา และทุก Page ที่โหลดเข้ามาคือ furniture ที่เปลี่ยนไปในแต่ละห้อง โครงสร้างคงที่ แต่เนื้อหาเปลี่ยนได้
สร้าง src/components/layout/Sidebar.tsx:
import { Link, useLocation } from 'react-router-dom'
import { clsx } from 'clsx'
import {
  LayoutDashboard,
  Cpu,
  Users,
  Activity,
  Settings,
  ChevronLeft,
  ChevronRight,
  Wifi,
} from 'lucide-react'
import { useUIStore } from '@stores/ui.store'
import { ROUTES } from '@router/routes'

interface NavItem {
  label: string
  path: string
  icon: React.ElementType
  badge?: number
}

const navItems: NavItem[] = [
  { label: 'Dashboard', path: ROUTES.DASHBOARD, icon: LayoutDashboard },
  { label: 'Devices', path: ROUTES.DEVICES, icon: Cpu },
  { label: 'Users', path: ROUTES.USERS, icon: Users },
  { label: 'Monitoring', path: ROUTES.MONITORING, icon: Activity },
  { label: 'Settings', path: ROUTES.SETTINGS, icon: Settings },
]

export function Sidebar() {
  const location = useLocation()
  const { sidebarCollapsed, toggleSidebarCollapsed } = useUIStore()

  return (
    <aside
      className={clsx(
        'flex flex-col bg-sidebar-bg text-sidebar-text h-full transition-all duration-300',
        sidebarCollapsed ? 'w-16' : 'w-64'
      )}
    >
      {/* Logo */}
      <div className="flex items-center gap-3 px-4 py-5 border-b border-slate-700">
        <div className="flex-shrink-0 w-8 h-8 bg-primary-600 rounded-lg flex items-center justify-center">
          <Wifi className="w-5 h-5 text-white" />
        </div>
        {!sidebarCollapsed && (
          <span className="font-bold text-white text-lg">IoT Admin</span>
        )}
      </div>

      {/* Navigation */}
      <nav className="flex-1 px-2 py-4 space-y-1">
        {navItems.map((item) => {
          const Icon = item.icon
          const isActive = location.pathname === item.path ||
            (item.path !== '/' && location.pathname.startsWith(item.path))

          return (
            <Link
              key={item.path}
              to={item.path}
              className={clsx(
                'flex items-center gap-3 px-3 py-2.5 rounded-lg transition-colors group',
                isActive
                  ? 'bg-primary-600 text-white'
                  : 'text-slate-400 hover:bg-slate-800 hover:text-white'
              )}
              title={sidebarCollapsed ? item.label : undefined}
            >
              <Icon className="w-5 h-5 flex-shrink-0" />
              {!sidebarCollapsed && (
                <span className="text-sm font-medium">{item.label}</span>
              )}
              {!sidebarCollapsed && item.badge !== undefined && (
                <span className="ml-auto bg-red-500 text-white text-xs px-1.5 py-0.5 rounded-full">
                  {item.badge}
                </span>
              )}
            </Link>
          )
        })}
      </nav>

      {/* Collapse Button */}
      <div className="p-4 border-t border-slate-700">
        <button
          onClick={toggleSidebarCollapsed}
          className="w-full flex items-center justify-center p-2 rounded-lg hover:bg-slate-800 transition-colors text-slate-400 hover:text-white"
        >
          {sidebarCollapsed ? (
            <ChevronRight className="w-5 h-5" />
          ) : (
            <ChevronLeft className="w-5 h-5" />
          )}
        </button>
      </div>
    </aside>
  )
}
สร้าง src/components/layout/Header.tsx:
import { Bell, Search, LogOut, User, Moon, Sun } from 'lucide-react'
import { useAuthStore } from '@stores/auth.store'
import { useUIStore } from '@stores/ui.store'
import { useNavigate } from 'react-router-dom'
import { ROUTES } from '@router/routes'

export function Header() {
  const { user, logout } = useAuthStore()
  const { theme, toggleTheme } = useUIStore()
  const navigate = useNavigate()

  const handleLogout = () => {
    logout()
    navigate(ROUTES.LOGIN)
  }

  return (
    <header className="h-16 bg-white border-b border-gray-200 flex items-center justify-between px-6">
      {/* Search */}
      <div className="flex items-center gap-2 bg-gray-100 rounded-lg px-3 py-2 w-72">
        <Search className="w-4 h-4 text-gray-400" />
        <input
          type="text"
          placeholder="ค้นหา..."
          className="bg-transparent text-sm text-gray-600 placeholder-gray-400 outline-none w-full"
        />
      </div>

      {/* Actions */}
      <div className="flex items-center gap-3">
        {/* Theme Toggle */}
        <button
          onClick={toggleTheme}
          className="p-2 rounded-lg hover:bg-gray-100 text-gray-500 transition-colors"
        >
          {theme === 'light' ? <Moon className="w-5 h-5" /> : <Sun className="w-5 h-5" />}
        </button>

        {/* Notifications */}
        <button className="relative p-2 rounded-lg hover:bg-gray-100 text-gray-500 transition-colors">
          <Bell className="w-5 h-5" />
          <span className="absolute top-1 right-1 w-2 h-2 bg-red-500 rounded-full" />
        </button>

        {/* User Menu */}
        <div className="flex items-center gap-3 pl-3 border-l border-gray-200">
          <div className="text-right hidden sm:block">
            <p className="text-sm font-medium text-gray-800">
              {user?.firstName} {user?.lastName}
            </p>
            <p className="text-xs text-gray-500 capitalize">{user?.role}</p>
          </div>
          <div className="w-9 h-9 bg-primary-600 rounded-full flex items-center justify-center">
            <User className="w-5 h-5 text-white" />
          </div>
          <button
            onClick={handleLogout}
            className="p-2 rounded-lg hover:bg-gray-100 text-gray-500 hover:text-red-500 transition-colors"
            title="ออกจากระบบ"
          >
            <LogOut className="w-5 h-5" />
          </button>
        </div>
      </div>
    </header>
  )
}
สร้าง src/components/layout/AppLayout.tsx:
import { Outlet } from 'react-router-dom'
import { Sidebar } from './Sidebar'
import { Header } from './Header'
import { useUIStore } from '@stores/ui.store'
import { clsx } from 'clsx'

export function AppLayout() {
  const { sidebarOpen } = useUIStore()

  return (
    <div className="flex h-screen bg-gray-50 overflow-hidden">
      {/* Sidebar */}
      {sidebarOpen && <Sidebar />}

      {/* Main Content */}
      <div className="flex-1 flex flex-col min-w-0 overflow-hidden">
        <Header />
        <main
          className={clsx(
            'flex-1 overflow-y-auto p-6',
            'scrollbar-thin scrollbar-thumb-gray-300 scrollbar-track-transparent'
          )}
        >
          <Outlet />
        </main>
      </div>
    </div>
  )
}
Step 10: App Entry Point — ประกอบทุกอย่างเข้าด้วยกัน
แก้ไข src/App.tsx:
import { QueryClient, QueryClientProvider } from '@tanstack/react-query'
import { AppRouter } from '@router/index'
import { Toaster } from 'sonner'

const queryClient = new QueryClient({
  defaultOptions: {
    queries: {
      staleTime: 1000 * 60 * 5, // 5 minutes
      retry: 1,
      refetchOnWindowFocus: false,
    },
  },
})

function App() {
  return (
    <QueryClientProvider client={queryClient}>
      <AppRouter />
      <Toaster
        position="top-right"
        richColors
        closeButton
        duration={4000}
      />
    </QueryClientProvider>
  )
}

export default App
staleTime: 5 minutes หมายความว่า TanStack Query จะ cache ข้อมูลไว้ 5 นาที ก่อนจะ fetch ใหม่ ช่วยลด API calls โดยไม่จำเป็น เหมือนระบบแคชน้ำในบ้านที่ไม่ต้องสูบทุกครั้งที่เปิดก๊อก
Step 11: Environment Variables
สร้าง .env.example:
# API Configuration
VITE_API_URL=http://localhost:3000/api

# App Configuration
VITE_APP_NAME=IoT Admin Panel
VITE_APP_VERSION=1.0.0

# Feature Flags
VITE_ENABLE_DARK_MODE=true
VITE_ENABLE_NOTIFICATIONS=true
สร้าง .env.local สำหรับ development:
VITE_API_URL=http://localhost:3000/api
VITE_APP_NAME=IoT Admin Panel (Dev)
Note: ใน Vite ต้องขึ้นต้นด้วย
VITE_เท่านั้น ถึงจะ expose ให้ client-side ได้ ตัวแปรที่ไม่ขึ้นVITE_จะไม่ถูก bundle เข้าไป เป็น security feature ที่ดีมากๆ
สรุป — เราทำอะไรไปบ้างวันนี้?
(✿◡‿◡) สิ่งที่น้องๆ ได้กลับบ้านวันนี้| Component | Technology | หน้าที่ |
|---|---|---|
| Build Tool | Vite 5 | Fast dev server, HMR, optimized build |
| UI Framework | React 18 + TypeScript | Component-based UI |
| Styling | Tailwind CSS | Utility-first CSS framework |
| Routing | React Router v6 | Client-side routing + protected routes |
| State | Zustand | Lightweight state management |
| HTTP | Axios + Interceptors | API calls + auth token handling |
| Data Fetching | TanStack Query | Server state management + caching |
| Forms | React Hook Form + Zod | Form validation |
Key Concepts ที่สำคัญ
- Lazy Loading —
React.lazy()ทุก page ทำให้ bundle แรกเบา โหลดเพจอื่นทีหลังเมื่อต้องการ - Path Aliases —
@/*aliases ทำให้ import path อ่านง่าย ไม่ต้องนับ../../../ - Interceptors — Auto-inject JWT token และ handle token refresh โดยที่ code ใน service ไม่ต้องรู้เรื่องเลย
- Protected Routes — ตรวจ authentication และ role-based access ก่อนเข้าหน้าไหนก็ตาม
หน้าตาจริงเป็นยังไง?
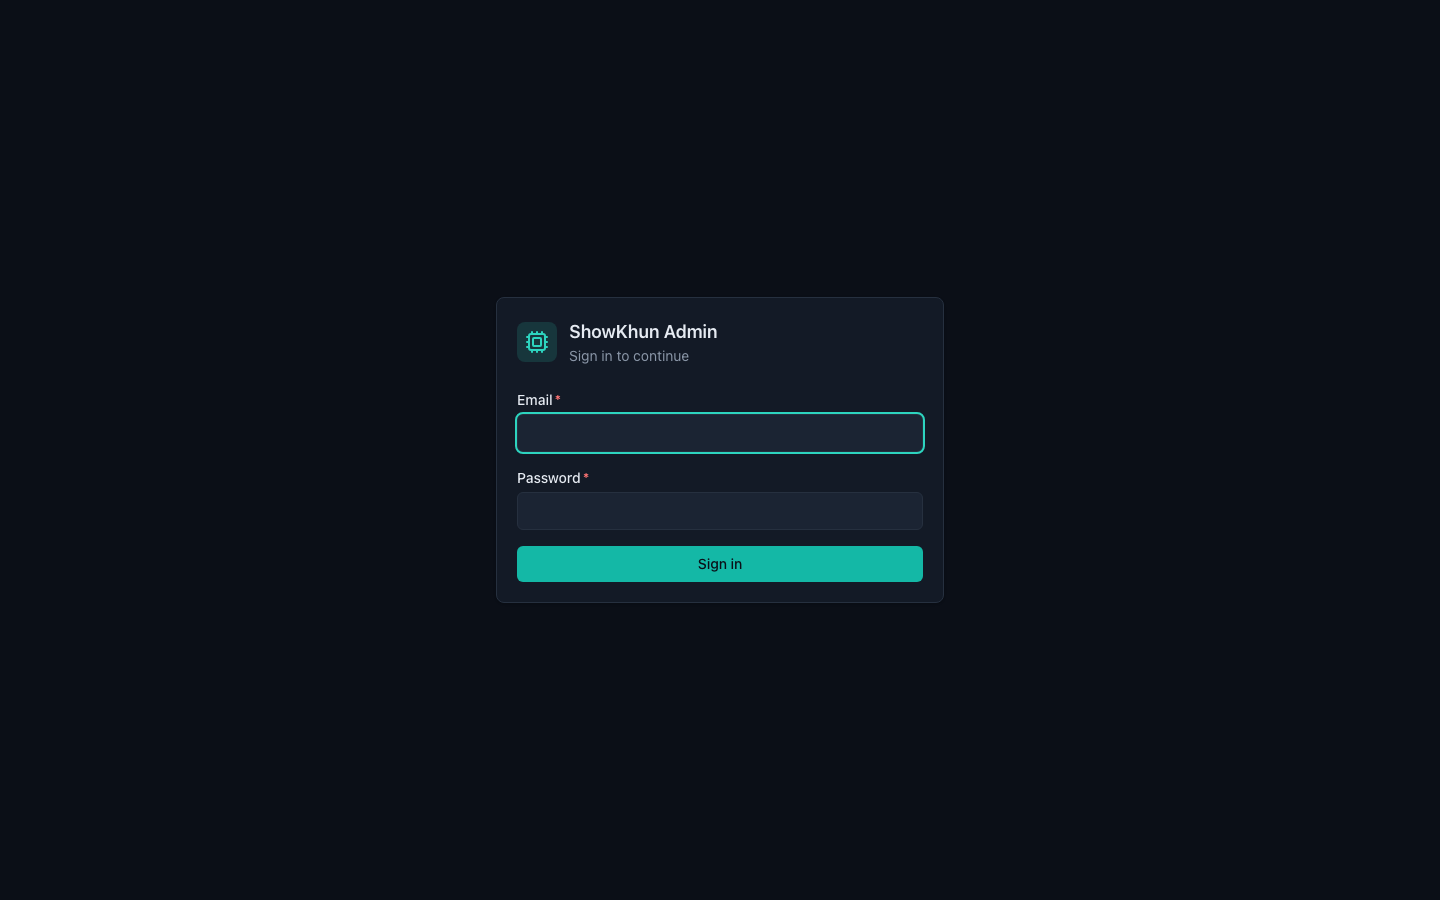
พอวาง foundation เสร็จ รัน npm run dev แล้วเปิดเบราว์เซอร์มาดู หน้าแรกที่เจอคือหน้า Login นี่แหละ — เรียบ สะอาด แต่ครบ มี validation พร้อม (รูปนี้พี่ถ่ายจาก E2E test ที่รันจริงด้วย Playwright นะ ไม่ได้ตัดต่อ):
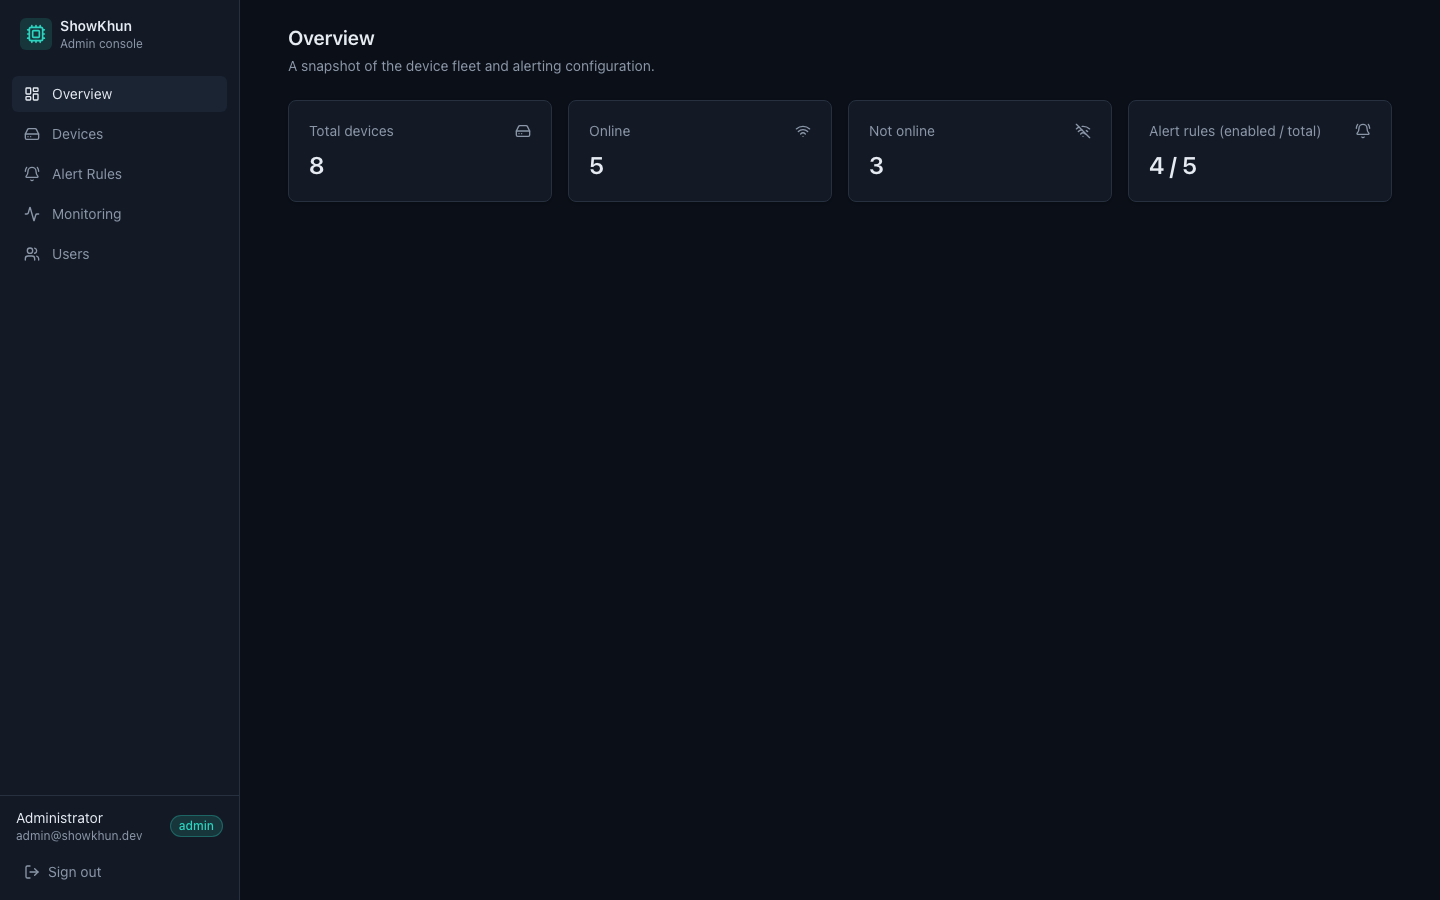
พอ login ผ่านปุ๊บ ก็เด้งเข้าหน้า Overview ที่มี Sidebar (AppLayout) ทางซ้ายแสดงเมนูครบ Overview / Devices / Alert Rules / Monitoring / Users พร้อมการ์ดสรุปสถานะ fleet — นี่คือโครงที่เราจะต่อยอดไปเรื่อยๆ ใน workshop ถัดๆ ไป:
Next Step
Workshop นี้เราวาง foundation ทุกอย่างพร้อมแล้ว! ขั้นต่อไปคือมาสร้าง CRUD operations จริงๆ สำหรับจัดการ devices — มีทั้ง list, create, edit, delete พร้อม form validation และ optimistic updates
มาลุยกันต่อใน Workshop ถัดไปได้เลย!